Showing posts with label Side Dishes. Show all posts

Friday, June 24, 2011

Zucchini Frittata


I can remember my mom making this dish (or a variation of it, because I changed a few things!) as a kid. She would make it for parties or family gathering and cut it up into small cubes for an appetizer. I am sure my siblings and I ate more than an "appetizer portion" it was yummy and always a treat. Now I make it for something to keep on hand for lunch or to serve with a salad for a light, summery dinner dish. I hope you enjoy it too!

Ingredients:
3 cups zucchini, grated
1 cup parmesan cheese, grated
5 eggs, lightly beaten
1 sweet onion, chopped
1/2 cup expeller pressed coconut oil
1 cup flour
1.5 tsp baking powder
1/2 tsp salt
1/4 tsp pepper
1/2 cup bread crumbs *** (see note below regarding seasoning)
6 mushrooms, chopped OR
1/4 cup orange bell pepper, chopped
***NOTE ON BREAD CRUMBS: you can purchase already seasoned bread crumbs and use those, or if you prefer, purchase or make plain bread crumbs and add 1/8 tsp. garlic powder, 1/8 tsp. dried oregano, and 1/8 tsp. dried basil for extra flavoring to your crumbs).

*** Note on Mushrooms VS. Bell Peppers: You can make this recipe either way, the bell peppers leave a sweeter taste to it, the mushrooms a more veggie taste, either way is good. The original recipe called for mushrooms, but I subsitituted when I didn't have any on hand. Don't use more than 6 mushrooms because they release moisture and will leave your dish too runny. Sometimes I make it without either!
Before
After
Directions:
Preheat your oven to 350 and grease a 9 x 13 glass dish. Mix all wet ingredients together first, then add the dry and mix until well blended. Pour into your glass dish and bake for 40 minutes until the top is lightly golden. Cool and cut into cubes for an appetizer or squares for a dish. This can be served hot or cold and makes great left overs!
Wednesday, June 22, 2011

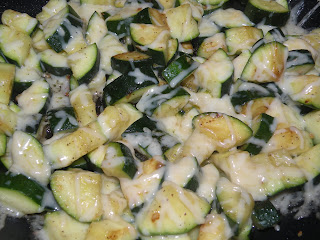
Simple Summer Squash-as-a-Side

Speaking of squash... I know my last post was on Squash & Fresh Basil Pasta, and my next post will be on Zucchini Frittata, so this post I wanted to share a simple side dish that's one of my favorite "go-to's" during the week, especially in the summer months when squash is SO plentiful! Here is an updated version of "Summer Squash as a Side".... then after that, I promise my next dish will not have any squash!!!

Ingredients:
3-4 small summer squash
1-2 cloves garlic, minced
Sea Salt
Pepper
Expeller Pressed Coconut Oil

Added Options, per your preference if you want them:
1 TBSP butter
1/4 cup red onion, finely chopped
a handful of shredded Parmesan Cheese

Instructions:
Chop 1/4 of a red onion, and put it in a frying pan with a drizzle of oil (and your TBSP of butter if desired). Saute the onion for about 2-3 minutes until tender or browned. While that is going on, wash your squash, cut off the ends, slice the squash down the middle and then cut it into 1/2 pieces. Once your onion is tender, add your clove of garlic and put the squash in the pan and let brown for 5 minutes, stirring occasionally so not to burn. In the last minute or two, throw a handful of shredded parmesan cheese on top and cover it with a lid to help it melt- or leave it plain- and serve as a side dish! It's delish!!!

Options to serve it with...
Serve this dish with chicken or beef, it's a quickie, so it comes in handy in a pinch! You can also grill strips of it on the BBQ if you already have that going and when you pull it off, you can throw some cheese on it to melt while it is still piping hot!

Tuesday, June 14, 2011

Tzatziki


Umm, this IS SOOOOOOOO good! For starters, let me say, I have a wonderful sister-in-law who is Persian.... she just so happens to be a great cook. So is her mom. And she has taken us to a few dynamite Persian restaurant's over the years, where without fail, they serve Tzatzkik. So, I have had scrumptious dish many times, thanks to her introducing it to me- and I finally got around to making a batch of it on my own when a big bunch of fresh dill showed up in my CSA box. This is a great recipe to make if you are going to a picnic or asked to bring an appetizer or finger food to a gathering... it will be LOVED by all, so make sure you make enough! I made it and snacked on it for lunch then served it as a side for dinner, and my whole family devoured it... it was that tasty--- and did I mention it's also fast, easy, error proof, minimal ingredients, so little prep---- I could keep going, really I could!

Ingredients:
16 oz. plain Greek yogurt
1/2 English cucumber, diced small
1-2 cloves garlic, minced
2 TBSP fresh dill, chopped finely
1/8 tsp sea salt
1/8 tsp pepper
***pitas, flat bread, or pita chips to serve with it

Directions:
Scoop your yogurt into a large bowl to mix everything in. Then mince your garlic, chop your dill, cucumber, and s & p. Then taste it, does it need more garlic for your taste buds?? add another clove. More cucumber, chop up another chunk. Serve it with pita bread, flat bread, crackers, pita chips, or over rice with kabobs (Persian style!). Cover and let chill until serving.

Wednesday, June 8, 2011

Harvest Grain Blend + Veggies

The other night I when I was getting dinner going I pulled out the leftover, unused veggies from the week and noticed I had an extra zuccini and 2 carrots, so I diced them up really small and tossed them into my Harvest Grains Blend (from Trader Joe's) to add a little more color, flavor and variation. It was a great way to incorporate veggies into our grains.

It's simple- Bring your broth to a boil and while that's boiling, chop your veggies, then add your grains, chopped veggies, and butter at the same time and cook for the 15 minutes on low. Both your grains and your veggies will be done at the same time- perfect combination! This is such a nice thing to keep on hand in your pantry and perfect for the last minute dinner addition because it takes such little prep and cooks so quickly! Enjoy!!

Sunday, March 27, 2011

Veggie Chop Salad..

I really wanted to make a salad the other night to accompany our Mexican Lasagna, but I was out of lettuce--- but that didn't stop me! I thought, not every salad needs lettuce, let's think out of the box! This was a crunchy, satisfying alternative to the everyday green salad that I always make!

Ingredients:
3 large carrots, peeled & chopped
1 red bell pepper, chopped
4 stalks of celery, chopped
1 crown broccoli, chopped
1/4 cup raw sunflower seeds, toasted

Directions:
Wash and chop your veggies. In a small skillet, add a drizzle of Grape Seed oil and your sunflower seeds, stirring them around to coat them in the oil. Add a shake of sea salt and stir once more cooking over medium heat until they are browned and toasted. Add them to your veggie chop right before so they don't get soggy. Drizzle on the dressing and serve!

Monday, March 14, 2011

Homemade Hummus

Simple. Creamy. Flavorful. Effortless. Enough said.

Ingredients:
2 cans garbanzo beans
1/2 cup olive oil
1/4 cup lemon juice
2/3 cup tahini
2 cloves garlic
1 tsp sea salt
2 TBSP pine nuts
2 tsp fresh parsley
* 1/2 tsp. red pepper flakes if you want to heat it up!
Directions:
Dump it all in your Vitamix or blender and puree until smooth. Serve with pitas, crackers, vegetables, and more!!

Tuesday, August 3, 2010

Black Bean and Corn Salad

Here's a great recipe for summertime.... It is quick, easy, and simple.... my favorite kind! I made it with "Chili Lime Chicken Kabobs" and it made for a great complimentary side dish!

Ingredients:
4 cups cooked black beans
1 red bell pepper, diced
1/4 cup red onion, diced
1 & 1/2 cups corn, fresh or frozen
1/3 cup fresh cilantro, chopped
** a handful of cherry tomatoes??? If you are a tomato lover, this would probably be a great accent to the salad... I am not a lover, so I didn't include them in the mix!

Dressing:
2 TBSP olive oil
1 lime, juiced
1 tsp cumin
s & p to taste

Directions:
Combine all the ingredients in a large bowl, pour dressing over top and season with s & p to your liking. If it seems like it needs a little sweetening for your liking, add a pinch of sugar. Set aside or refrigerate to allow flavors to blend. This salad can be served at room temp or refrigerated and will last up to 5 days stored in an air tight container.

Sunday, August 1, 2010

Fruit Kabobs

This is another one of those things that I have enjoyed for so long and have simply forgot to add to my blog, so without further a-do... the ever cute Fruit Kabobs.

This is great year round, using whatever fruit is in season at the time. My good buddy Sarah Jane makes them every year for the 4th of July, and I use them a lot with big groups, showers and parties. They are easy to put together and easy for people to to enjoy without having fruit roll all over their plate!

Simply buy wooden skewers at the grocery store and pick up any fruit that is seasonally ripe. For summertime, any of the melons, pineapple, strawberries, and even blueberries work well. In the colder months, think about oranges, apples, grapes and bananas. Softer fruits like peaches and raspberries have a tendency to fall off the skewers. Also, keep your chunks bigger-the thinner you slice them, the more likely they are to fall off the skewer. And if you are preparing these for a large group, it's easy to cut up all the fruit the night before and store it in separate Ziplock bags until an hour or so before when you can assemble them on the skewers.

Fun Dip Ideas to serve with your Fruit:

Lemon Yogurt Drizzle:
1 lemon, zested & juiced
8 oz vanilla yogurt
2 TBSP lemon curd

Mix the lemon curd with the yogurt, zest the lemon (about 2 tsp) and add it some lemon juice for extra flavoring, to your tasting. Stir well and refrigerate until using. This is a runnier dip for drizzling over the top of your fruit.
* This is great to use if you are serving this for a breakfast or brunch, it's refreshing and tangy, and more of a drizzle than a dip!

Strawberry Cool Whip Dip:
1 carton or cool whip, defrosted
1 container of strawberry yogurt, pre-stirred
* Mix the two together and chill before serving. This is more of a sweet treat and looks really cute!

Tuesday, February 16, 2010

Cauliflower & Brussel Sprouts....


I adapted this recipe from one I previously posted on Roasted Brussel Sprouts- it's nothing fancy, just threw in another veggie with it- this time it was cauliflower and it was delicious! I quartered my brussel sprouts (because they were huge!) and then cut the cauliflower into small chunks and tossed them all with some Grape Seed oil, 3 cloves of garlic, and s & p. I roasted them on a roasting pan (or cookie sheet lined with parchment paper) on 4oo for about 15- 20 minutes. Then I served them with a drizzle of balsamic over the top- they were delicious! Great combination and great way to introduce more veggies to your pallet!

Wednesday, November 11, 2009

Asparagus Dipping Sauce...

I had complete forgot about this little treat until visiting my mom this weekend, she makes this everyone once in awhile as a dipping sauce for steamed asparagus. It's really simple and you will already have the ingredients on hand.

Ingredients:
1 tsp. mustard
1 1/2 TBSP. Soy sauce

Directions:
These measurements make enough for one, so multiple it times as many people as you are serving. Then, measure, pour, and mix. Serve it with steamed or boiled asparagus.

Saturday, October 17, 2009

White Bean Salad


I am trying to use more beans in my cooking- good fiber, inexpensive, great protein, easy to cook with and travel with... and tasty little guys! So, here's a salad to leave in the fridge and munch on for lunch- perfect for road trips when you don't want to stop or for packing a lunch for work!

Ingredients:
2 can beans, drained but not rinsed
4 TBSP red onion
1 TBSP olive oil
3 tsp. wine vinegar, white or red
2 tsp. fresh chopped parsley
1/2 lemon, juiced
s & p

Directions:
Drain, but don't rinse 2 cans of white beans and add them to a bowl. Add the other ingredients. Stir, cover, refrigerate for at least an hour or over night. Enjoy. How easy was that?

Friday, October 9, 2009

Roasted Brussel Sprouts

Thanks to a fabulous family vacation, I took some time off from recipes, but we are refreshed and ready to get back in the saddle with some yummy fall meals!

Roasted Brussel Sprouts drizzled with Balsamic Vinegar...

So up until a few minutes ago, if you were to ask me if I liked Brussel Sprouts, I would have answered without hesitation, without a doubt- NO WAY!!! But things have changed around these parts, I can now (thanks to Natalie's recipe) answer, Yes I do!!!! Check out Natalie's blog for the original recipe and some other tasty ones I can't wait to try!!!

Here's what I did to roast them....
Ingredients:
3 large handfuls of small brussel sprouts (from Costco) for 2 people
a generous amount of Grape Seed Oil (or Olive Oil if you prefer)
1 clove garlic, minced
sea salt
pepper

Directions:
Preheat your oven to 425. Wash and trim the bottoms of your brussel sprouts (discard any damaged outer leaves) and cut them in half. Throw them in a bowl, generously drizzle Grape Seed Oil on top (or Olive Oil) then mince garlic and add s & p. Mix well and pour on to a roasting pan or a cookie sheet lined in parchment paper. Quickly with clean fingers, flip them over so the flat side is on touching the cookie sheet. Pop them in the oven for 8-10 minutes (for small sprouts, 10-12 for larger ones). They will be browned on the underside when done. I served them with a sprinkle of balsamic vinegar on top, because, well, everything is better with balsamic :) Enjoy, you are now officially an adult- you ate brussel sprouts!
Brussel Sprouts tossed with ingredients...
Laying flat on the parchment-lined cookie sheet...
Served up with some Teriyaki Chicken Thighs...

Wednesday, September 16, 2009

Orzo & Cucumber Pasta Salad...

I had this salad at my sister-in-laws the other night and it was delicious! Unfortunately I didn't have my camera with me, so there isn't a picture of it, but it was so yummy I thought I should include it on the blog. You must use fresh ingredients when making this- fresh lemons and fresh herbs- it is wonderful, a real crowd pleaser!

If you haven't entered the giveaway on the 100th post, make sure to do so now, it ends on Friday, Sept. 18th!!!!

Ingredients:
3/4 lb. orzo pasta
1/2 cup fresh lemon juice
1/8 cup olive oil
1/2 cup finely chopped scallions
1/2 cup fresh dill, chopped
1/2 cup fresh parsley, chopped
1 hothouse cucumber, peeled and sliced
1/2 cup small diced red onion
3/4 cup feta cheese
1/2 tsp sea salt
1/4 tsp pepper

Directions:
Bring a pot of water to boil, cook the orzo pasta for 9-11 minutes, or until done. Whisk together olive oil, salt and pepper. With pasta in a bowl, pour the lemon mixture over top and mix. Add your dill, parsley, scallions, cucumber and onion and toss. Add your feta crumbles last and gently stir. Cover and refrigerate over night or let it sit at room temperature before serving for one hour. Taste before serving and add extra salt and pepper if it's needed.
* You can throw a handful of cherry tomatoes in as well. And the original recipe called for cooked shrimp tossed in too, as a main dish, I liked it without, but feel free to try that option too! Here's a picture of it with shrimp from the Food Network so you can get an idea of what it's like!


Wednesday, September 9, 2009

Brown Rice Medley

Here's another one of our favorites, a side dish I use a lot with my "juicer" dishes like my ginger glazed mahi mahi, balsamic chicken and more. The goodness is sold in a pouch at Trader Joe's. It has long grain brown rice, black barley, and daikon radish seeds. All you have to be able to do is boil water, add a smidge of butter, and the rice mixture and you will have yourself a healthy and hardy side dish!

Friday, September 4, 2009

Grilled Veggies & Portabella Mushrooms


So, in my quest to be more productive in my dinner making skills, the nights we BBQ I try to do most of my dinner on the grill. So, I will BBQ a meat and then add things to the grill like squash, peppers, onions, and mushrooms for the veggie portion of the meal. Almost always I take the easy route and do the simple thing: wash and cut my veggies, use a basting brush to apply olive oil or grapeseed oil to both sides so they don't stick to the grill, and then I lightly dust them with the "ol' faithful" seasoning blend of salt, pepper, and garlic powder. Throw those puppies on the grill until your preferred doneness- some like 'em crunchy, some like 'em mushy- you be the judge!

*** For a FABULOUS recipe for portabella mushrooms with a few more ingredients that take a few more minutes, but I am not kidding, they are mouth-watering good, check out my sister's blog!!!!

Monday, August 31, 2009

Sauteed Swiss Chard

So here's raw Swiss Chard... I prefer the white stemmed verses the red or multicolored, but feel free to try them yourself!
Here's what it looks like once it's sauteed, simple and delicious!


OK, so this weekend, I had quite possibly some of the best meals in my life while celebrating a dear friends Birthday weekend, one of which was a New York steak served over a bed of sauteed Swiss Chard and Pumpkin Mashed Potatoes!!! YUM! So it reminded to post one of my favorite veggie dishes- Sauteed Swiss Chard with Balsamic Vinegar. It only takes a few minutes and it is packed with vitamins and flavor!

Ingredients:
1-2 batches of swiss chard 
1-2 cloves of garlic, minced
olive oil
balsamic vinegar
2 TBSP water

Directions:
Wash your swiss chard leaves and then chop them into strips length wise. You can use the white stems, but I pass on them because I am not wild about their flavor. Add about 2 TBSP of water to your frying pan and your cloves of garlic. Let that heat up, then add in your chopped chard (which will have some water on it from rinsing, which is a good thing). Let it sautee uncovered until it cooks down (just a few minutes, then add a small drizzle of olive oil and mix it up with a pair of tongs. Remove it from the pan onto a plate and then drizzle balsamic vinegar over top and enjoy!

Friday, August 28, 2009

Harvest Grains Blend


ATTENTION: This is an idea, not a recipe, the recipe is a free-be on the back of the package!!!!
 
I just had to post this, because for the past 6 months this has been our families grain of choice. We love it, the kid loves it, friends love it- it's about time it makes it to the blog!!! It is an awesome blend of couscous, red quinoa, orzo, and baby garbanzos. It is so chewy and fluffy and high in protein, we love it as a side dish to anything! AND if all that wasn't good enough, it cooks in 15 minutes or less with just some chicken broth (I recommend broth verses water for the flavor) and you can add a TBSP of butter if you want, but it's not necessary. If you have kids, you will love this, because it stays kinda clumpy so it is easy for them to scoop up and eat! Give it a whirl, you know where to find it if you read this blog--- TRADER JOE'S!!! ** Follow the measurements on the package.

Thursday, August 27, 2009

Roasted Red Potatoes

Ingredients:
1- 1.5 pounds red potatoes
2 TBSP olive oil
2 TBSP coarsely chopped rosemary
S & P ( I prefer sea salt)

Directions:
Preheat your oven to 425. Wash and cube your potatoes, you choose the size, the smaller they are the faster they cook. (I usually cut mine in 4ths or 6ths). Toss the potatoes in a bowl with the olive oil, rosemary, s & p and then pour them out onto a roasting pan or cookie sheet (I put parchment paper down first for faster clean up). Make sure they are in a single layer for best cooking results. Bake for 30 minutes or until golden brown, turn them once half way through the cooking process. Enjoy!

NOTE: I have made them without rosemary before, you can substitute it for fresh garlic (2 cloves) or garlic powder if you don't have fresh- but fresh is so good and so good for you!!! I also have added garlic WITH the rosemary and that is yummy too!

Monday, August 24, 2009

Parmesan Toast


So, this is a little hokey, especially because it's not a recipe, and it's not at all "pretty or unique" it is just simple practical and fills that little empty spot- you know the one that's there when you finish dinner but you still have 10% hunger left in you??? Well, this takes care of that 10%! We do it on nights when dinner is a little light or when we need that extra crunch with a salad and I don't want to buy an entire loaf of french bread for the 2 of us that will get thrown out with mold on it in a day of two! You can definitely use the same idea with french bread, it's just as tasty! Hope it helps fill your 10% :)

Ingredients:
Bread (I use Trader Joe's "Whole GRAIN" sliced bread)
Butter
Garlic Powder or Garlic Salt
Parmesan Cheese, shredded

Directions:
Turn your broiler on (that's part of your oven if you have never used it!) Get out your bread slices, spread on your butter, sprinkle your garlic, top with parmesan cheese and pop it in the oven for just a few minutes. I lay them on something, a cookie sheet, a cake pan, something to keep them from making a mess all over my oven. Now keep your eye on these little guys, I have burned mine more times than I can count and they really do only take a few minutes!

Saturday, July 18, 2009

Snappin' Snap Peas


Okay, so my friend Krissa asked what to do with the left over mint she had (after making her Thai Chicken Wraps) so here's another recipe that calls for mint. It's a veggie dish, with some different flavors mingled in, give it a go for something new.....

Ingredients:
Snap Peas (I buy a package of them at Trader Joe's)
Olive oil
Red Pepper Flakes
Salt
lemon juice
lemon zest
mint, chopped

Directions:
Preheat your oven to 450 degrees. You are going to rinse your snap peas and "clean" them if desired (I pull the little strings off both ends to make them easier to chew!) Put the rinsed snap peas in a bowl, lightly drizzle some olive oil, shake some salt and a few shakes of red pepper flakes (if you have them, you can omitted if you don't). You are going to roast them for 10 minutes, then when you pull them out, give a squeeze of fresh lemon juice (and a few zests of the lemon rhine) over top and lightly sprinkle your chopped mint. Enjoy as a unique side of fresh veggies at lunch or dinner!